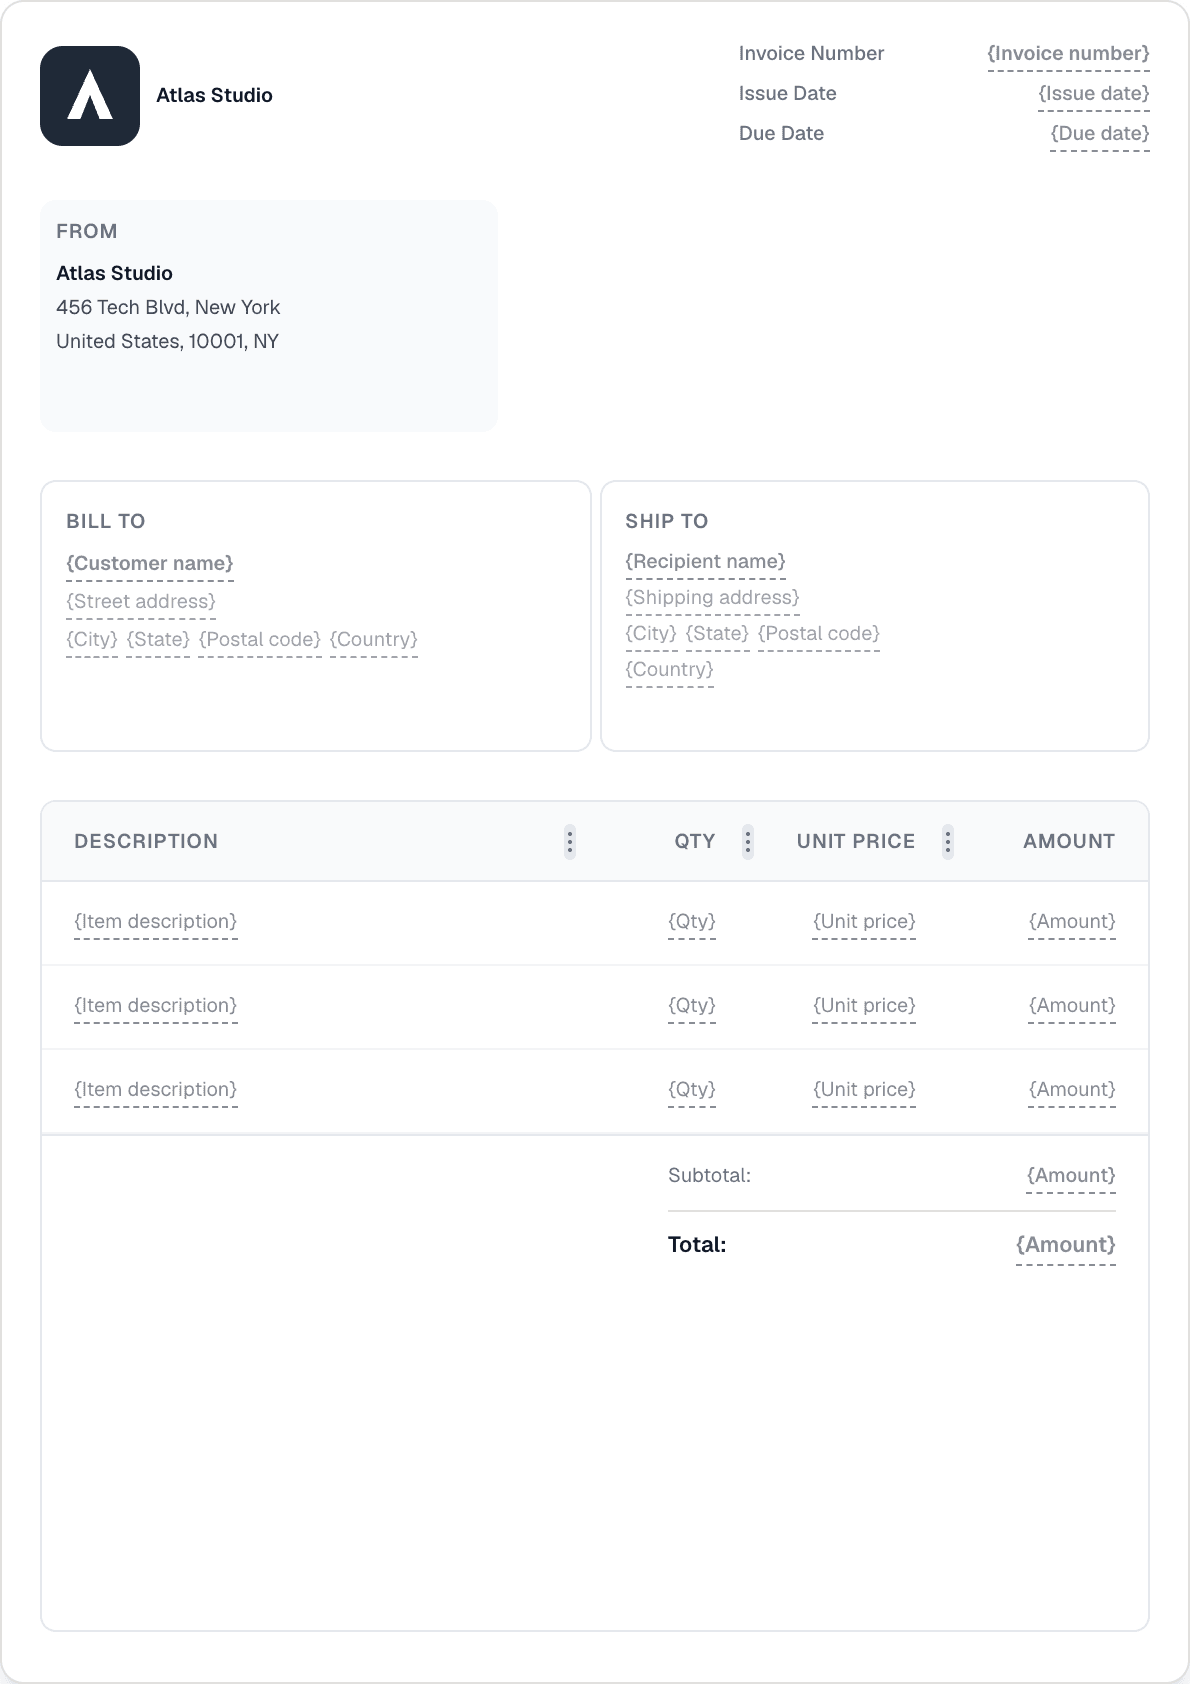
How to Create an Invoice: A Step-by-Step Guide

Learn how to create a professional invoice from scratch — choosing a template, adding your business details, line items, taxes, and sending it to your client — using the Invotify block-based builder.

Published 2026-06-14

What Goes on a Professional Invoice?

A well-formed invoice contains six core elements: your business name, address, and registration or VAT number; the client's name and billing address; a unique invoice number and the issue date; a due date or payment terms (such as Net 30); an itemised list of goods or services with unit prices, quantities, and any applicable taxes; and the total amount due in the agreed currency.

Optional but frequently required fields include a purchase order (PO) number if the client's procurement team issued one, bank transfer details or a payment link, a signature block, and legal notes or payment-penalty clauses. In the EU, a VAT invoice must also show the supplier's VAT identification number, the customer's VAT number for B2B cross-border transactions, and the applicable tax rate per line.

Getting this structure right from the first invoice matters: errors in tax amounts or missing mandatory fields can delay payment, trigger queries from client finance teams, or result in rejected VAT reclaim submissions.

Step 1 — Choose an Invoice Template

Invotify ships with 12 professionally designed invoice templates across two sets: five style-focused layouts (Classic Business, Modern Minimal, Professional Corporate, Creative Bold, and Compact Efficient) and seven company-type designs built for consulting, legal, creative studio, technology, construction, accounting, and architecture businesses. Each template is a distinct layout using different block combinations — not the same skeleton with a colour swap.

Open the Templates section from the sidebar and click any template card to preview it as a full-size A4 render. When you find the right fit, clone it to your workspace. You can also start the template builder from scratch and drag blocks into position using the canvas editor.

For most businesses, starting with a company-type template closest to your industry is the fastest path to a polished invoice. The block system lets you add, remove, or rearrange every element afterwards — so no template is a hard constraint.

Step 2 — Add Your Business Details

The "From" block carries your company name, address, registration number, and VAT number. Invotify reads these from your company settings and pre-fills them automatically on every new document, so you only enter them once. Update them any time in Settings → Company.

Your logo appears via the Brand block. Upload a PNG or SVG and the builder previews it at the exact size and position it will appear on the printed invoice. Accepted formats include transparent-background assets — recommended for dark and light template backgrounds alike.

If you bill across multiple currencies, set your default currency in settings. Invotify supports 102 currencies; the billed currency is set per document, with each invoice issued in whichever currency the client expects.

Step 3 — Add Client Details

The Bill To block links to your customer database. Select an existing customer from the dropdown or create one inline without leaving the invoice editor. Each customer record stores the billing name, address, email, and optionally a VAT number for B2B EU transactions.

For recurring clients, Invotify pre-fills all billing details automatically when you select them. Their preferred currency is also applied. You can override any field per document — useful when a client has multiple billing entities or projects tracked under separate addresses.

Step 4 — Add Line Items and Taxes

The Item Lines block is the core of every invoice. Each line holds a description, quantity, unit price, and tax rate. Invotify auto-calculates subtotals and the grand total as you type, keeping a live running sum visible at all times.

Tax rates are pre-filled from your company's tax preset settings. If your country applies a standard VAT rate, Invotify resolves it automatically from your registered country. You can override the rate per line for mixed-rate invoices (for example, a line at the standard rate alongside a zero-rated supply). Discount columns and a custom subtotal label are available via column configuration in the Item Lines block settings.

For clients from your saved product catalogue, click the product-picker icon on any line to populate the description and unit price in one click. Stock movements are recorded automatically if you track inventory in Invotify.

Step 5 — Configure Payment Details and Due Date

The Date block sets the issue date and due date. Payment Terms (Net 30, Net 14, Due on Receipt, or a custom label) are set via the Payment Terms block. Invotify can calculate the due date automatically from the issue date and your selected terms.

The Payment Details block displays your bank account information — IBAN, SWIFT/BIC, account name, and reference. If you have connected a Stripe account (Pro/Lifetime plan), Invotify also generates a payment link your client can use to pay by card or bank transfer directly from the invoice. The payment link is embedded in the emailed PDF and in the client-facing share link.

Step 6 — Send the Invoice

Once your invoice is ready, click Send. Invotify generates a PDF from your template and sends it to the client's email address with a professional message. The email includes the PDF as an attachment and a link to the client portal, where the client can view the invoice, download it, and pay online if payments are enabled.

Track the invoice status from the dashboard: Draft → Sent → Paid (or Overdue if the due date passes without payment). Invotify can send automatic payment reminders at intervals you configure — reducing the need to chase clients manually.

For international clients requiring EU-compliant structured e-invoice files (Peppol BIS 3.0, UBL 2.1, or CII/XRechnung/Factur-X), use the E-Invoice export option available on Pro and Lifetime plans. This produces a machine-readable XML file alongside the PDF for submission to government portals or direct buyer ERP ingestion.

Related Resources

Related Articles

Ready to send your first invoice?

Create a professional invoice in under a minute. No design skills needed.